The Power Behind Your Convenience
A garage door opener battery powers the convenience we rely on daily, but when it fails, you could find yourself locked out. Whether it’s your remote, keypad, or the main unit’s backup system, these small power sources are vital for smooth operation, especially during power outages. The good news is that replacing these batteries is a quick DIY task that usually doesn’t require calling a professional from AA Garage Door Repair Services.
Quick Answer for Garage Door Opener Battery Replacement:
- Remote/Keypad Batteries: Usually CR2032, CR2016, A23 (12V), or 9V – last 1-2 years
- Main Unit Backup Battery: Typically LiftMaster 485LM or similar – lasts 1-3 years
- Signs to Replace: Beeping opener, flashing LED, reduced remote range, unresponsive buttons
- Tools Needed: Small screwdriver, step ladder (for main unit), safety glasses
- Time Required: 5-15 minutes depending on battery type
That frustrating moment when your garage door won’t respond often comes down to a simple battery issue. Common warning signs include a beeping opener, a flashing LED on the motor, or a remote that only works up close.
I’m David Sands, owner of AA Garage Door LLC. In my 23+ years of experience, I’ve seen countless homeowners stress over what turns out to be a simple 5-minute battery fix. This guide will help you identify, purchase, and replace every battery in your system, so you’re never stuck outside again.

Is It the Battery? Signs You Need a Replacement
Your garage door system has clear ways of telling you its garage door opener battery needs attention. Recognizing these signs helps you avoid getting locked out on a rainy morning.
- Persistent Beeping: The opener unit beeps every 30-60 seconds to alert you that the main backup battery is low.
- Flashing LED Light: An orange or red flashing light on the opener, instead of a steady green, signals a battery issue.
- Shrinking Remote Range: If you have to get closer to the door for the remote to work, its battery is dying.
- Unresponsive Controls: Needing multiple button presses on your remote or keypad is a classic sign of a weak battery.
- Wall Switch Only: If the opener only responds to the hardwired wall switch, your remote’s battery is likely dead.
For more detailed troubleshooting on remote issues, our Garage Door Remotes guide covers additional symptoms and solutions.
What Kind of Battery Do I Need?
Your system uses different batteries for different components. Remote controls and keypads typically use small coin cell (CR2032, CR2016), cylindrical (A23 12V), or standard (9V, AA) batteries. The main opener unit’s backup system uses a larger, rechargeable sealed lead-acid battery, like the LiftMaster 485LM.
| Battery Type | Voltage | Common Uses | Expected Life | Notes |
|---|---|---|---|---|
| CR2032 | 3V | Most modern remotes | 1-2 years | Thin, coin-shaped |
| CR2016 | 3V | Compact remotes | 1-2 years | Thinner than CR2032 |
| A23 | 12V | Older remotes | 1-2 years | Small cylinder |
| 9V | 9V | Keypads | 1-2 years | Standard rectangular |
| 485LM | 12V | Main unit backup | 1-3 years | Rechargeable, brick-sized |
To find the right type, check the model number printed on the old battery itself. If that’s not possible, consult your owner’s manual or look up your opener model online. For more information about popular brands, check out our guide on LiftMaster Garage Door Openers.
Where to Buy Replacement Batteries
Replacement batteries are widely available at hardware stores, big-box home improvement stores like Home Depot, online retailers, and specialty battery shops. Just ensure you match the correct voltage and size to avoid damaging your device.
How to Replace Batteries in Remotes & Keypads: A 5-Minute Fix
Replacing the garage door opener battery in a remote or keypad is a satisfying DIY win that takes just minutes. You’ll only need a small flathead screwdriver or a coin.

Step 1: Open the Casing
Locate the seam or screw on the remote’s casing. For keypads, the battery compartment is usually on the back. Use your screwdriver or a coin to gently pry the case open at the seam.
Step 2: Swap the Battery
Note the orientation of the old battery—specifically which side is facing up (usually the positive ‘+’ side). A quick phone photo can help. Slide the old battery out and insert the new one in the exact same position, ensuring it clicks securely into place.
Step 3: Test and Reprogram if Necessary
Snap the casing back together and test the remote. If it doesn’t work, the remote may have lost its programming and needs to be re-synced with the opener unit. Check your owner’s manual for reprogramming instructions, which typically involve pressing a “learn” button on the motor unit and then the remote button. If you’re still stuck, more troubleshooting tips are covered later in this guide.
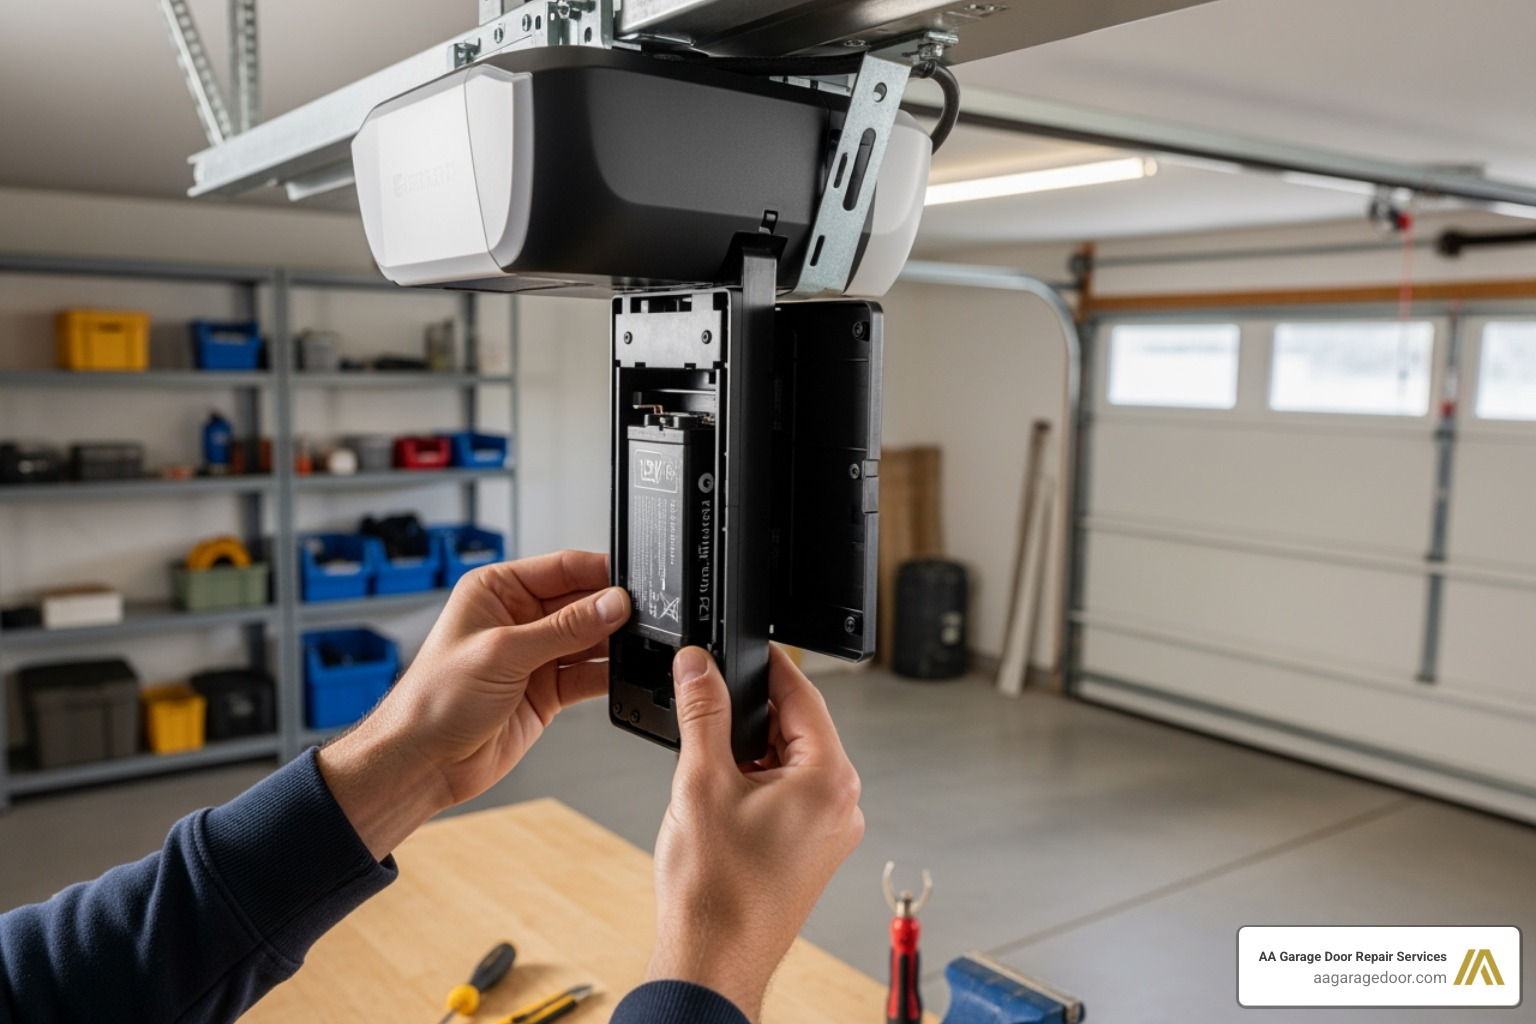
How to Replace the Main Garage Door Opener Battery Backup
Replacing the main unit’s garage door opener battery backup is your key to staying operational during a power outage. While it’s a bigger battery, the process is still straightforward and ensures you’re never truly stuck.

Before you start, take these safety precautions: unplug the opener from the wall outlet, use a sturdy step ladder, and wear safety glasses. You’ll likely only need a Phillips screwdriver.
Step 1: Disconnect Power and Locate the Battery
With the power disconnected, use your ladder to access the motor unit. The battery compartment is usually located behind the light lens or on the side of the unit, often marked with a battery symbol or the words “Battery Backup.”
Step 2: Remove the Old Battery
Use a Phillips screwdriver to remove the cover’s screw and slide the cover off. Carefully disconnect the black (negative) and red (positive) wires from the battery terminals. Pull on the metal connectors, not the wires themselves, to avoid damage.
Step 3: Install and Charge the New Battery
Connect the new garage door opener battery, matching the red wire to the positive (+) terminal and the black wire to the negative (-) terminal. Slide the new battery into the compartment, replace the cover, and secure it with the screw. Plug the opener back in. The new battery will need 24-48 hours to fully charge. Some openers may beep during this initial charging phase, which is normal.
After the Swap: Testing and Troubleshooting
After replacing your garage door opener battery, a quick test ensures everything is working correctly. For remotes, just press the button. For the main backup battery, wait 24 hours for it to charge. Then, unplug the opener to simulate a power outage and test if your remote can open and close the door. Once plugged back in, a solid green LED usually indicates a full charge.
What If It Still Doesn’t Work?
If you have issues, run through this checklist:
- Battery Orientation: Double-check that the positive (+) and negative (-) sides are correctly positioned.
- Wire Connections: Ensure the red and black wires on the main backup battery are secure.
- Wall Control Lock: Make sure the “lock” or “vacation” button on your wall control isn’t engaged, as this disables remotes.
- Reprogram Remote: The remote may need to be reprogrammed to the opener. Check your manual for instructions.
- Safety Sensors: If the door won’t close, check that the safety sensors at the bottom of the door tracks are clean and aligned. Our guide on Garage Door Sensor Troubles can help.
If these steps don’t solve the problem, the issue could be with the opener’s logic board, which may require professional Garage Door Opener Repair.
The Importance of a Battery Backup
A battery backup is essential for safety and convenience. During power outages, it provides power for about 20 open/close cycles, ensuring you can get in and out of your garage. This is crucial during severe weather or other emergencies. In fact, its importance is highlighted by laws like California SB-969, which mandates backups in new installations. A working backup provides invaluable peace of mind, knowing your garage will be accessible no matter what.
Frequently Asked Questions about Garage Door Opener Batteries
Here are concise answers to common questions about garage door opener battery maintenance.
How often should I replace my garage door opener batteries?
For remotes and keypads, replace batteries every 1-2 years. Heavy use and cold weather can shorten this lifespan, so an annual replacement is a good proactive measure. The main unit’s backup battery should be replaced every 1-3 years, or when the opener alerts you with beeping or a flashing light. Testing it twice a year when you check smoke detector batteries is a great habit.
How do I properly dispose of old batteries?
Never throw batteries in your regular household trash. They contain chemicals that are harmful to the environment and should be recycled. Check with your local waste management service for guidelines, or take them to recycling drop-off points commonly found at home improvement stores, electronics stores, or municipal recycling centers.
Why is my garage door opener beeping?
A consistent beep every 30-60 seconds is the most common indicator that the main backup battery is low on power and needs to be replaced. This is a built-in warning to ensure you’re not caught unprepared in a power outage. The beeping should stop once a new battery is installed and begins charging. If it persists after 48 hours, there may be an issue with the opener’s charging system that requires professional attention.
Conclusion: Stay Powered and Prepared

You now have the knowledge to manage your garage door opener battery system, preventing lockouts and ensuring reliability. Regular battery checks and timely replacements are simple DIY tasks that take only a few minutes but provide significant peace of mind.
While most homeowners can handle this maintenance, we understand if you prefer professional service, especially for troubleshooting complex issues. If your garage door system is still uncooperative after trying these steps, AA Garage Door is here to help. Our experienced technicians have provided fast, reliable service for all garage door repair needs in the Twin Cities and Western WI since 2001.
Don’t let a dead battery disrupt your day. If you need expert assistance, contact us online. Your convenience and security are our top priorities.